Tuesday, November 22, 2011

Pinterest EXPLOSION!

Now that it's cold outside (finally!) I'm getting the urge to lock myself inside and be all crafty. I have been giving Pinterest a little peek and getting a few ideas, so I decided one of our walls needed a little updating. I already had quite a few black 8x10 frames, so all I bought was some canvas. Here is the product:


I painted all the states that we have been born in. I was born in Maryland, Greg was born in Missouri and the kids were born in Texas. If you look closely (please don't), my lettering is pretty horrible because I don't own an X-acto knife and was having a hard time cutting out letters to use as a template. Instead of cutting, I tried to free-hand it and it turned out okay. After looking at them for way too long, if I had it all to do again, I would probably leave out the state names and just put the outlines of the states. But the paints already dry, and I'm not doing it again!
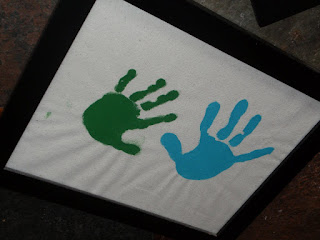
To keep it symmetrical, I needed one more frame to go horizontal. I decided to do the kid's handprints. It was hard doing their handprints perfect, so I went back and touched it up. Looks much better the second time around.


I made a big "J" out of buttons. I WAS going to sew them on, but then I laid out the buttons and saw there were a ton of them. I decided to bust out the super glue. It went much faster, but got a lot of glue on my fingers. It was a very "sticky" situation....hahahaha!Finished product with the artwork that I painted/glued.Then I decided to throw in some black frames. To keep the pattern correct I had to turn the picture of Nolan sideways. Don't fret, it won't stay that way. I'm thinking of putting some black and white photos of our trip to Germany on the left and right to elongate the picture area. Maybe another day....

The Big Cookie Project: Week 31

Turk(ish) Cookies!! Do you like my play on words? Well, it's not really a play on words but close enough. I thought of making cookies that looked like turkeys to celebrate Thanksgiving, but instead I made cookies that were FROM Turkey! I don't know if people from Turkey have any knowledge of Thanksgiving, but I'm definitely using one of their recipes to celebrate Thanksgiving in Texas. So then I started looking for Turkish cookie recipes and found a shortbread recipe. The reason I chose it was because it had an ingredient that I don't think I've ever used in cookies before...corn starch?!?! Here's the recipe:
Ingredients:

400 grams butter/margarine at room temperature (I did the conversion and it's about 3 1/2 sticks)

9-10 Tbsp. powdered sugar

1 Tbsp. vanilla

3 cups corn starch

2 cups all purpose flour

1/2 cup powdered sugar for top (optional)

Directions:

1. Take powdered sugar and soft butter/margarine in a large bowl and mix. Add starch slowly

2. Add vanilla and flour. Mx until dough becomes smooth and soft

3. Grab large pieces of dough and roll in to a ball, place on cookie sheet and gently press down.

4. Bake at 350 degrees F for 15-20 minutes. Dust with powdered sugar when they come out of the oven.


When making these cookies in to balls it reminded me of the "Corn Starch Experiment". If you've ever done it in school, the whole thing is that when you mix corn starch and water it becomes this liquid that when you apply pressure to, it seems solid; but when you reduce the pressure it seems to turn in to a liquid again. When I was finished with the dough, it seemed very crumbly and I thought making the balls would be a disaster. But just like the experiment, after I applied pressure to make the balls, they magically came together and formed a solid ball!


After I dusted them, I couldn't wait for them to cool and see if they would taste delicious or gross. They were really good! The only downfall to this cookie is that it is very dry and sucks the moisture out of your mouth. Definitely have a drink close at hand! All in all, I give them two thumbs up.


Enjoy your Turk(ish) Cookies for Thanksgiving!

Saturday, November 19, 2011

The Big Cookie Project: Week 30

Yay for Lemony Sour-Cream Cookies! These turned out really well this week and have a hint of lemon flavor, but is not overwhelming. The only problem I ran in to was that the recipe asked for freshly grated lemon peel. Apparently, I have no clue how to grate a lemon peel. We have one of those graters with four sides and four different sizes of grates. I used every single side to try and grate some lemon, but had no success. After a few minutes of struggling, I finally just cut off a chunk of peel and tried to dice it as small as possible. I must be handicapped in the "zesting" department. If you look hard enough you can see a large chunk of peel that I didn't chop small enough, but added great flavor when I bit in to it.
Also, if you are looking for a cookie without eggs, this is the recipe for you. The sour cream in the recipe gives it that extra moisture and was a good replacement. Here's the recipe:
LEMONY SOUR-CREAM COOKIES:
Ingredients:
1 cup all-purpose flour
1/4 teaspoon baking soda
1/4 teaspoon salt
6 Tablespoons butter or margarine, softened
1/2 cup sugar
1/2 cup sour cream
1 teaspoon freshly grated lemon peel
1/2 teaspoon vanilla extract

Directions:
1. Preheat oven to 350 degrees F. In small bowl combine flour, baking soda and salt.
2. In large bowl, beat butter until creamy. Gradually add sugar and beat until light and fluffy. Beat in sour cream, lemon peel and vanilla. Beat in flour mixture just until blended.
3. Drop dough by rounded teaspoons, 1 inch apart. Bake until cookies are set and edges are golden, 1o to 12 minutes. Cool on a cookie sheet.
4. Repeat with remaining dough

I bet these cookies would go great with a cup of hot tea, but since I am not a hot tea drinker someone else might have to try that out for me. Enjoy, and I hope you have a better time grating than I did!

Sunday, November 13, 2011

My Pumpkin Turkey

I don't know about you, but after Halloween I was pumkin-ed out. We carved pumpkins, painted pumpkins, ate pumpkin seeds, I even crocheted pumpkins as a table centerpiece. Now that we are officially past October 31st and quickly approaching Turkey Day, I needed a cute turkey project. The only problem was I had little pumpkins laying around, which are still perfectly good and I didn't want to trash them yet. So, I came up with the Pumpkin Turkey! (probably not an original idea, but still cute!) Here's my template that I drew for the feathers and the turkey's body. I drew five feathers, but you could definitely do more.

Here is the finished product. I asked Nolan what he was thankful for, I colored the feathers (next time I'll let him color) and then cut everything out. I was contemplating on how to get the feathers on to the pumpkin and went with bamboo skewers we had laying around the house. I divided one skewer in to three parts and started shoving them into the pumpkin. I only used 2 skewers, so I will have plenty left for actual food products.

Then, I just taped the feathers to skewers and there you have it, a Pumpking Turkey! The only downfall is that he is not super cut from the backside, but that's okay. Here are the five things Nolan was thankful for:

1. Toys...of course

2. my sister...the only real person he named, very touching and cute. Eventhough he asked to trade in Mallory for a new sister, because the one he has is too loud for him.

3. Race Car Plane and Man...a toy he got. A little airplane with action figure that goes SUPER FAST!

4. Dragons...because they definitely exist :)

5. Mouseketeer Movie...a movie we just finished watching, and he wanted to watch again immediately.


Enjoy and Happy Turkey Day in 10 days!


The Big Cookie Project: Week 29

We'll have to record this week as a big fail. I've made these cookies before, and they just didn't seem to come out right, so I thought that maybe I would give it a shot for the Big Cookie Project.
This recipe goes WAY BACK. When I was in first grade and studying dinosaurs, our teacher had us practice our writing by writing a recipe. The title of the cookie recipe was "Dinosaur Droppings" (I don't know who would ever name a cookie that, because it makes it sound so unappetizing and sort of gross). Some of the ingredients were "crushed bone" aka sugar. It really kept with the whole dinosaur theme.
I had no recollection of writing this recipe until a while back I found it in a drawer and realized my mom had kept it all these years! We made the cookies and they turned out great. Well...time passed and I was wondering what the recipe was. My mom finally lost the "Dinosaur Droppings" recipe, so I was left to find the recipe online. It's not that the cookies taste bad, they actually taste okay, but they don't get firm. I don't know what I'm doing wrong, but I'm pretty sure they aren't supposed to stay in a sad little clump that I can't peel off the wax paper. Maybe you'll have better luck...
"Chocolate Oatmeal No-Bake Cookies"
Ingredients"
1 stick butter
2 cups sugar
1/2 cup cocoa powder
1/2 cup milk
1/2 cup smooth peanut butter
3 cups instant oats
1 tsp. vanilla
Directions:
1. Combine butter, sugar, cocoa powder and milk in a large saucepan and heat to a low boil. Stir until mixture is smooth.
2. Remove from heat and add peanut butter, vanilla and oats.
3. Drop by tablespoonful on wax paper to let harden up. Can be stored in a containter in the refrigerator.

This is the picture after just adding in the oats. I have to admit, it sort of does look like dino poop...or atleast what I imagine what dino poop would look like :)This is the final step after dropping them on to the wax paper. I had such a hard time getting a clear picture of the cookie. It was almost as if they were saying, "No, I'm ugly! You can do better!"
I'm thinking maybe I didn't boil the mixture long enough. This will bug me until I figure it out. If you have a solution or a recipe that works, I'd love to hear it. Good luck and happy baking!


Sunday, November 6, 2011

The Big Cookie Project: Week 28

This weekend my mom got to come in to town and visit and I was trying to think of a trademark cookie that my mom fixes that we could do together. She doesn't do a lot of cookies, but she does do these delicious candies called Heath Saltines that we have also dubbed "Christmas Candy". The reason we call it that is because she only makes it one time a year around Christmas, and it goes so fast she can't keep it stocked in the house. By no means is it near Christmas yet, but I'm all in the cheery spirit with cooler weather and with every store carrying lights and decorations. Here is the recipe:

HEATH SALTINES

Ingredients:

1 cup butter

1 cup brown sugar

1 sleeve saltines

12 oz. bag of chocolate chips

Directions:

1. Line pan and sides with foil, grease with butter and make a single layer of saltine crackers on the bottom.

2. Cook butter and brown sugar over medium heat until it becomes caramelized (when it coats the spoon and doesn't run off)

3. Pour over crackers and bake at 350 degrees F for 5-7 minutes. If some crackers "float" in the butter, just push them down.

4. Pour 12 oz. bag of chocolate chips and stick back in the turned-off oven, about 6 minutes, or leave them in until they melt. Spread chocolate layer and refrigerate.

5. When completely cool, break in to pieces


This picture above is after baking the crackers and putting on the chocolate chips. I then put the pan back in to the oven until the chocolate chips are melted.This is the finished product. Instead of refrigerating, I freeze the candy. It seems to be a bit crunchier after freezing, which is how our family eats it.


I've been eating WAY too many of these. Every time I pass the freezer, I break off a piece and eat it quickly before the chocolate starts to melt. I think the best part of this candy is that since the bottom layer is toffee-like, I pick up one piece and three have been stuck together. Maybe that's why it's going so fast, I'm not eating just one tiny piece, but whole chunks at a time.


We had a fun time making it and eating some pieces while watching a movie. That was the best part, doing it together and ushering in the holiday season with a little treat!

Friday, November 4, 2011

The Rhyme Crime


After reading Dr. Seuss since the day Nolan came home, he is finally trying to put rhyming words together. The first time he said,"cat rhymes with hat!" I thought, "He's a genius," and the next rhyming words were something like "booger rhymes with foot"....mmm...not so much. So, we are a work in progress but atleast he's trying new words.


Most of the time, his combinations were really cute, sometimes funny, but he took a wrong turn today.


We were in the car driving home from visiting Greg at HEB and he was trying to rhyme words and he said,"Stuck, F*ck, does that rhyme?" AAAHHHH!!!! With the biggest effort ever, I tried not to flip out as he kept on repeating the curse word saying,"Yes, that does rhyme, but we NEVER say that word."

Nolan: "Why?"


Me: "You don't say it, it's a curse word, it makes us sad when you say it."

Nolan: "Why?"


Me: "Have you ever heard me or daddy say that word?" (me crossing my fingers that he would say no)


Nolan: "No, but why?"


Well...I really don't know exactly why. I curse word is just a word but used in the right tone and context it sounds so horrible. I gotta give credit to Nolan, that was the happiest curse word I have EVER heard come out of anyone's mouth. All I could do was laugh under my breath the rest of the way home from the word mix-up.


In the end, I'm hoping that he will keep on rhyming, but leave the dirty words out, or atleast only in earshot of me where I can catch them first.