Sunday, October 16, 2016

Kitchen Remodel is DONE!

This post has been a long time coming!  I am so excited to share with you what we decided to do with our kitchen.

Before
 When searching for our 3rd house, the thing on the top of my list was a completed kitchen.  Our previous two houses had the wonderful white laminate counter top/back splash that stained at the drop of kool-aid and seemed to never be able to keep clean.  Well, we finally chose a house that had everything on our dream list EXCEPT the kitchen.  So, first thing on our to-do list was to start saving up for a kitchen remodel.  We started with replacing the knobs, microwave, stove/cooktop and the dishwasher.  Then, life happened and the AC had to be replaced and mission trips had to be paid for.  2.5 years later and we finally got started!

Looking toward the laundry room.  Really dislike the faux painted wall of yellow and brown

Had our box flourescent light closed up and 4 can lights took its place
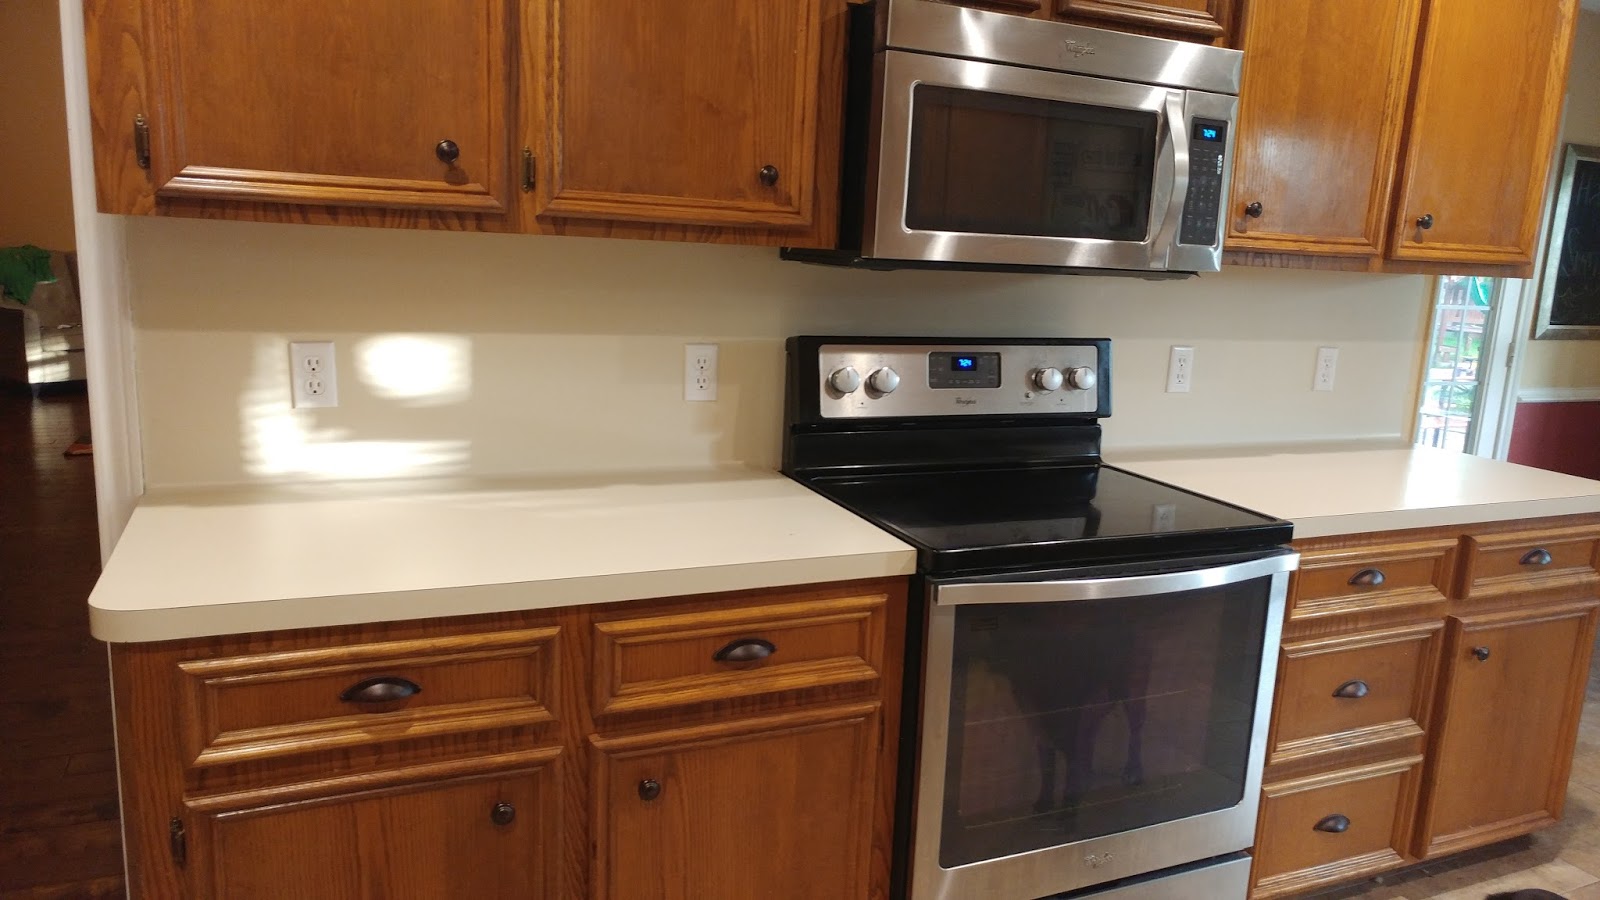
All that white counter top and back splash.  It really showed our house's age.
Still more white counters
White porcelain sink with a ton of scratchs

During

We chose yellow river granite for our counter tops and a tumbled stone with a light grout for the back splash. I really struggled with these decisions for some reason.  It seemed so easy to spend the money in my head, but in real life spending the money seemed a little more difficult. We went with the aged bronze for our faucet and a big stainless steel sink.


Paint!
This decision was another tough one.  I had so many ideas going through my head, I had a hard time just choosing one.  I didn't want it to be too "farmhouse" or too "country" but not super cookie-cutter either.  I was leaning toward a greenish gray, but when seeing them in person, our family actually went with a blue gray called "Fresh Idea".  I think it really compliments the wood tone and earthy tones of the counters.  It seemed WAY too blue at first, but once we got all of the red  and yellow off the wall it really did grow on me!


 Just for reference, the above picture are the original colors.  A butter cream on the top (which our whole house is painted in) and a crimson on the bottom.  All the butter cream was covered up by the new paint and the crimson was covered up by plank PVC bead board (best product ever!).

After (Finally!)


I love the completed look!  It makes me happy to walk in to my kitchen every day!  The counter tops are a great camouflage for crumbs (almost too good), and everything just seems to go together.

I was a little spoiled by renovation shows.  I thought it would all be done within two days, but the whole process took from finish to end was about two weeks and then I had to finish hanging the bead board.  The only thing I have left to do is paint the bead board a high gloss white, but who knows when that is going to happen and I wanted to share!


Monday, June 20, 2016

My Progression of Emotions Towards Running

Oh, so many emotions towards running. The funny thing is they change weekly.  So, I thought I'd elaborate and share with you the roller coaster of feelings these past 9 weeks.

To start, I decided to start running 10 weeks ago.  After hernia surgery in December, and quitting my gym membership (mom guilt), I had no exercise outlet.  So, I laced up my shoes and started running (let's be real, a jog).  I have no goal in mind.  I don't own a scale, so the only weigh-in I do is my yearly check-ups.  I have no desire to do a 5K, 10K, or half-marathon.  A reason I did start running was to maintain or even lose a little weight, and this is told by how my clothes fit and how I feel.  Let's get started:

Week 1:  Thoughts running through my head:  "I think I'm dying."  "Why would anyone do this for fun?"  How long do I have to be gone for Greg to come looking for me?"  "I'm pretty sure my  6 year old can run faster than me."  "I'm still dying."

Week represented through emojis:
Week 2:  Mallory joined me for the next few weeks.  I had to listen to her sweet voice tell me that she is faster than me and ask why I go so slow.  It was actually good bonding time, when I could breathe.  Thoughts:  "I might not be dying, but I still don't enjoy this."  "I still feel silly."

Week represented through emojis:
Weeks 3 & 4:  These weeks were where I wanted to quit.  I was running past some kids and thought they said something mean.  My feelings were hurt by a 12 year old.  That was pretty depressing, but Greg reminded me that I blow things out of proportion (only a few times) and it was probably all in my head.  So, I gave myself a pep-talk and kept going.  Thoughts:  "Middle schoolers are stupid."  "I can do this."  "I am officially not dying!!"

Week represented through emojis:

Week 5:  This week I started a longer run with a friend.  It was great conversation time, as well as an accountability person.  Thoughts:  " It's sort of nice to run with a friend."  "I might be enjoying running a teensy-weensy bit."  

Week represented through emojis:  
P.S.  We don't dress like this to run, but friend emojis are slim-pickings.

Weeks 6-7:  My goal at the beginning was to run atleast 2 times a week.  I am doing 3.  I am motivated to accomplish this number. I added more distance and am changing up my routes (I get bored very easily with exercising).  I have started timing my miles...which I will not be sharing because it is so sad.  Thoughts:  "Feeling stronger."  "I got this!"

Week represented through emojis:
Week 8:  VBS Week. Those two words should explain everything. It was a very LONG week. Only did one long run, and only one thought:  "So. Much. Sweat."  Welcome Summer, you are extremely hot!

Week represented through emojis:

Week 9:  I just finished my run and met two goals.  One:  I ran the WHOLE time!  Now, some of that running might have been very slow, but it still counted.  Two:  I met a time goal for my mile.  Was pretty happy since I went a little earlier than usual and could barely breathe, it was so hot and humid.  Thoughts:  "Getting faster!"  "Faster than my 6 year old!"  "Hard to breathe, but still doing it!"  "Just one more minute."

Week represented through emojis:  
Sort of looks like me, don't you think?? Except the smile, I am never smiling when running.  Haha.

So, there it is in a nutshell.  I will be finishing Week 9 on the beach.  I've never run on the sand, but we shall see.  

In the wise words of Dory, "Just keep swimming." ...but running in this case.  


Sunday, May 22, 2016

Back Patio Re-Do!

Snazzy-ing up the back porch was pretty low on my "To-Do" list, but I got an itch to paint some furniture and I though the Adirondack chairs would be a perfect project.  

My dad had built the Adirondack chairs many years ago and had tried to paint them right after building them.  But since the pressure-treated wood was new, the paint just flaked off.  Frustrated, he never painted them again.  After they switched hands a few times, they ended up on our back porch screaming for a makeover.  

I started with the accent pillow.  I guess I should have taken a picture of the pillow, you can see a little of it in the picture below.  They are royal blue, with a row of brightly colored birds.  I first was going to paint them orange to go with the royal blue.  I headed to the big-chain store and picked up a can of spray paint + primer.  I asked the paint guy if this would cover pressure-treated wood and he said, "Yeah, sure."  I came home all excited and put the first coat on the underside of the chair to make sure I liked it and...womp womp.  It looked horrendous.  The orange wasn't soaking up, and stayed tacky.  It just looked BAD.

Plan B.  Go the long route of priming them with real paint.  Shortcuts went out the window.  I bought Zinnser primer (great stuff, by the way) and started painting. Instead of going with orange paint, I decided to go with Aqua blue exterior paint, and am in love with it! Greg had also picked up some benches that we used for a present and then one for our garden.  I decided to paint those as well.  I got one chair and one bench done, but the weather and some chair repairs put us on hold for a few weeks.

Let's just say that when my dad built something, he built it to last...forever...and never be taken apart...not even by a hurricane.  Chair #2 had a rotten leg and needed to be replaced.  There was a large bolt, plus 4 screws (that I saw) holding the leg together.  Well, after removing the bolt that was paint encrusted, 8 rusted screws, and then finding out it had liquid nails on it, I ended just banging it with the hammer until the leg finally popped off.  Greg helped me cut the new leg and put in new screws and voila, the chair was ready to paint!  But the weather had a different idea.  It kept raining, and I needed a dry spell to paint.

I finally got that dry spell today.  After a little monsoon passing by us yesterday, everything started to dry out, and the sun finally came out!  I finished all the painting, finally swept the back porch and Greg helped me hang the lights that were 40% off at Michael's ( I love stuff on sale)! I am absolutely horrible of taking "Before" pictures, and not too great at taking "During" pictures, but here are some "After" pictures for your enjoyment:

From the kitchen door facing outward.  Loving the aqua blue I chose for the chairs!

Looking on to the back porch.  Love the new lights!

From the yard, the whole patio.  This is our new picnic table we got from Round Top.  Reminds us of Germany.

The new sod!

One of the benches
A week or so ago, I saw our neighbor laying sod in his yard.  He had a few pallets full of sod, and I mentioned that if he had any left over, I would pay him for it.  He let my buy 30 square feet, which didn't cover as much of the dead spot in the middle of the yard as I thought.  A few days later, he said he had more, and I could take 30 more square feet.  I happily took it, and covered more of our sad-looking yard.  The rain has been great for the St. Augustine grass to take root, but I probably need another 60 square feet to put a real dent in the bald spot.

That will be another project for another day. For now, I will eat a cookie and enjoy the back porch.


Wednesday, March 16, 2016

Painting a Piano!

I painted this piano a while ago, but am just getting around to writing (typing?) about it.  The piano was one of the first projects I used Annie Sloan chalk paint on.  I started with an end table first (forgot to take pictures of that project).  The top to the end table had come off, there were nicks and scratches on it, and I had accidentally spilled a bottle of pink nail polish on it.  Needless to say, it needed a new coat of paint.  So, for my birthday I asked for a quart of Annie Sloan paint in Provincial Blue.  I started with the end table first: glued the top back on, made sure to wipe and clean all surfaces and started painting!  It went really well and I was itching to paint something else, so the piano became my next project.

Picture #1:  We got this piano free from friends of a friend.  They were moving, and didn't want to move it.  So we got it, free of charge!  The kids like to play on it,  I got a few beginner books and it has been fun to play around on.  But it was a drab brown that blended in with the floor too much. Why not paint it blue?

 Picture #2:  This was after two coats of the Provincial Blue.  I kept it like this for a few weeks, but still felt that something was missing.  It was better than it was, but not its best.
 

Picture #3:  I decided to cover the bench with this fun arrow print.  I put some batting down as well to make it a little more comfortable.  I remember covering this in my closet during nap time.  I didn't want to wake up the smallest with all my nailing, so I hid in the closet covering a piano bench.


 Picture #4:  I decided to add some white accents!  Definitely gave the piano a little more oomph and pizzazz.  I really did want to paint behind the keys, but couldn't figure out how to get the keys to stay down, so that area stayed brown.


I think the only area that was a big oops was the varnish.  I did a light coat of Annie Sloan varnish on all the whole piano except the top.  I wanted to do something a little more water proof in case a drink was left there.  I had previously purchased some boat varnish (for a wooden sign for a garden that needed to withstand the weather) and decided if it was good enough to keep water off of a boat, it was good enough for the top of my piano.  Well, this varnish has a yellow tint to it and it left my white paint looking a little yellowish and discolored.  No one notices unless I point it out, and the top is covered with nick knacks anyways.

I enjoy this piece so much.  It ties my living room together because it shares its color with the end table.  Seems like it will be sticking around for quite a few years!

Sunday, March 13, 2016

Tube TV turned bookshelves

This year will be the year of finishing projects.  I have so many half-projects or even ideas floating through my head, and it's time to complete them.  Of course, this will be the perfect place to record these projects.  

My project that has probably lasted the longest (almost 8 months) is the tube TV turned bookshelves.  Ever since I was a tween (forever ago) I would watch Caroline in the City.  Anyone else remember that show??  Anyways, she had an old TV turned fish tank and from that moment on I knew that I would do some kind of project involving some of those components.  

In June 2015 (remember, I started 8 months ago), our church has a huge garage sale.  I saw this beauty for sale.  I totally took a gamble and DIDN'T buy it.  First, because I was cheap, second, because I was cheap.  Well lucky me, a few days later the garage sale was done and it was sadly sitting by the garbage bin waiting to be thrown away.  I got some tools and another handy person, and removed the gut of the TV.  Let me tell you, the project almost came to a halt when I found a live cockroach crawling on the inside.  I was about to scrap the whole idea, that's how much I hate those bugs.   


Picture #1:  June 2015.  TV is tubeless and ready to be carted home. 

 Picture #2:  Phase 2: The Shelves.  I have a handy friend who helped me out with the shelf building, probably on the promise of chocolate chip cookies that I never made.  This phase was completed in August of 2015...and then a lot of time passed.


Phase 3: The paint!  After a few weeks I finally got around to painting the shelves.  I painted the outside with white chalk paint generously given to me no charge by my sister who had some left over from a previous project.  I painted the inside shelves "Pure Silver".  It is actually our bathroom color, left over from that project.  Remember, I am cheap :).


Finished the paint in October 2015


 Original knobs glued and screwed in.


 Phase 4:  Finally convincing Greg to let me put it in the house!  After much discussion and garage cleaning, I finally brought it in to the house in January 2016


I ended up putting my mixer on top and stacking all my cookbooks underneath.  I thought it fit perfect under a little gallery of pictures we've collected over the years.  

Shortly after placing it in the kitchen, we ended up getting a new kitchen table that was MUCH larger than the old one.  The TV shelves no longer fit. :(  It is shortly going to a new home, a friend who will be using it as a night stand/bookshelves.  Nice to know that it will be going to a good home where it will be well taken care of .