Friday, March 22, 2019

Dressers, Dressers, Dressers!

I have definitely been on a painting furniture kick these past 6 months.  They were all so different: the shapes, the colors, the handles. I loved that about them though.  Here they are!

Mission Style-Turned modern
This was a 6-drawer dresser that was mission style.  Pretty basic, and I think it turned out great! This isn't my favorite picture, but technology is disagreeing with me right now.   I sanded all the veneer to roughen it up and started priming and painting! This dresser was actually my first time using a roller.  It did leave a little bit of texture, but so does using a paint brush.  I just had to get used to how hard/soft to press and making long/consistent rolls.  We chose a flat dark blue paint.  It doesn't look very dark, but when it was placed in its home, it looked great.  We also changed the hardware to gold bars, which definitely modernized it! I was commissioned to do this one, and I hope they enjoy it for years to come!


 Chest of Drawers: Ethan Allen 1960's
This was a discarded piece of furniture.  It had some surface mold so it was given to me.  I was worried how it would clean up.  With a little elbow grease and a lot of bleach it came out great! I decided to leave drawers the original wood color, because they were in such great shape and a great tone.  The outer body had a little bit more damage, so I decided to paint that a pretty dark blue.  Yet again, this blue is actually darker when you get it into a room.  I guess that is the downside of working in your garage and getting so much sunlight, all colors look lighter than what they really are, and you see EVERY imperfection.

The handles were gold and rusty.  Took an old piece of plywood and drilled holes to hold all of my handles and spray painted them matte black.  My original plan was to use aged-bronze cup pulls, but the smaller pulls are 2" and I couldn't find anyone that made pulls that small, not even Amazon! I think it turned out great!  I didn't even post this one for sale, I had a friend's son in mind, it was a perfect addition to his room.


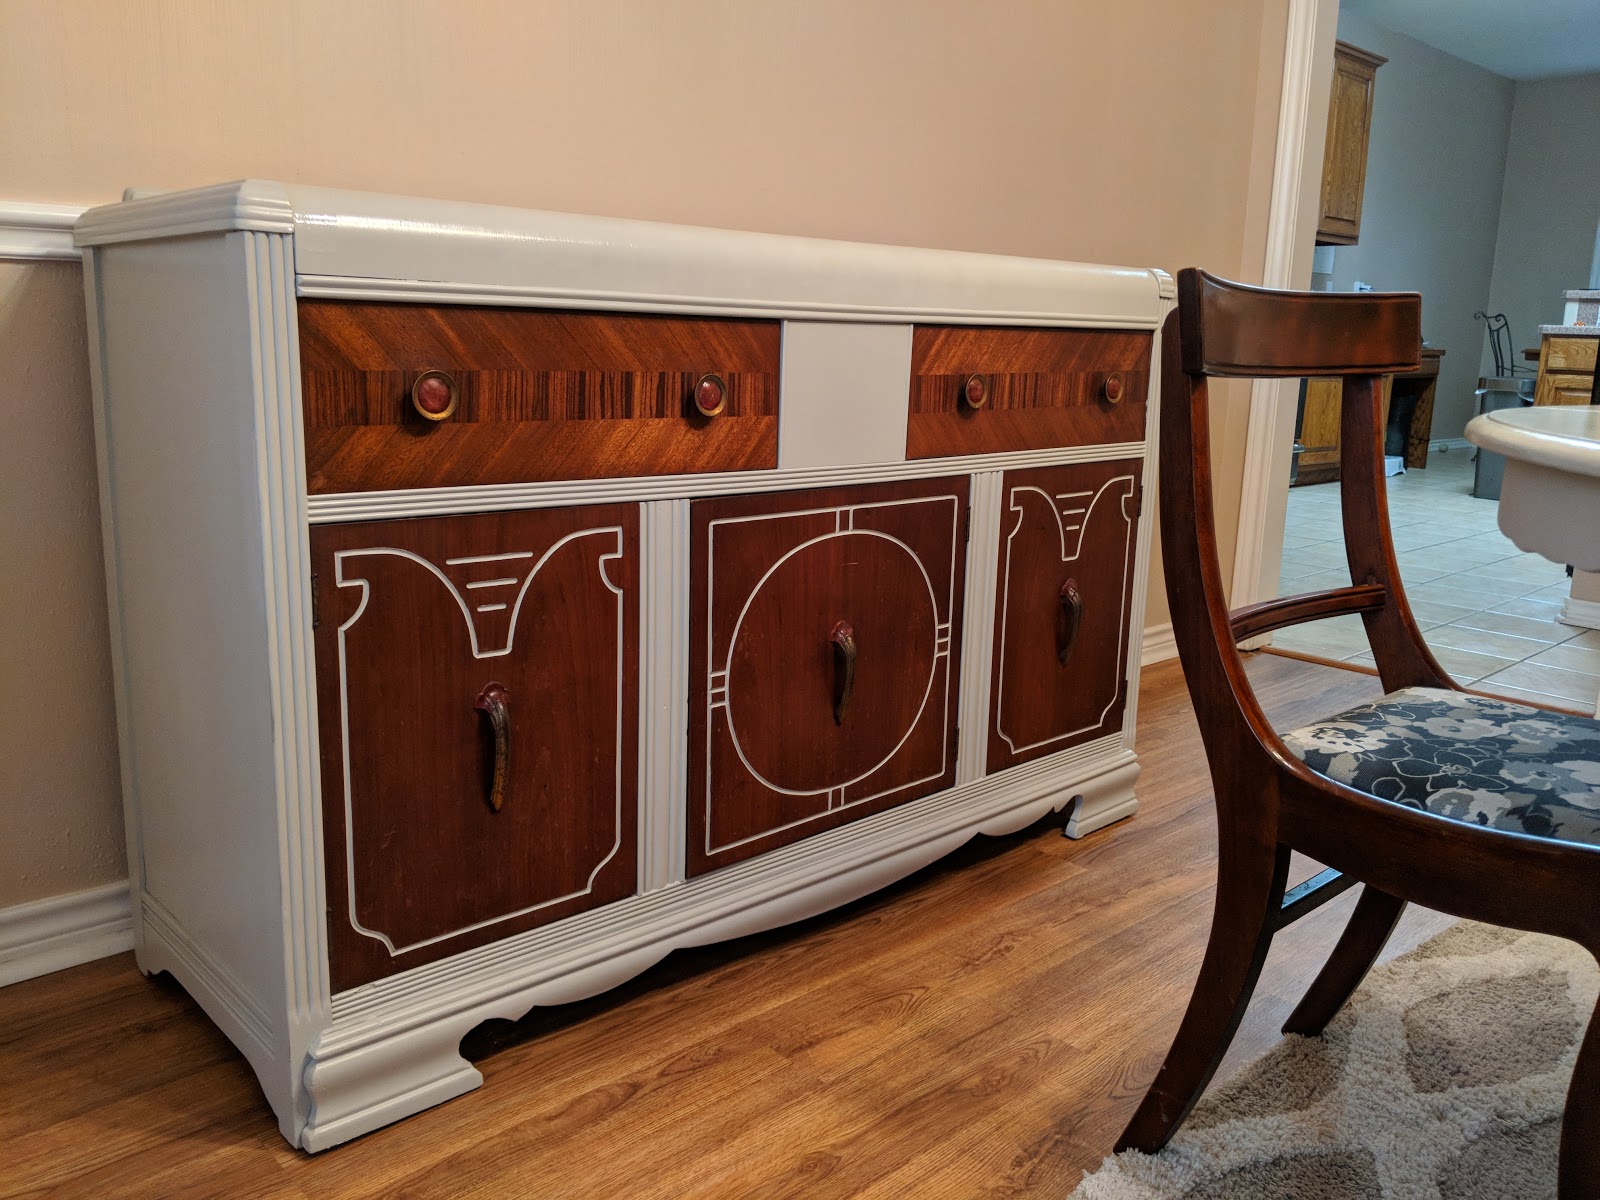
 Ethan Allen Chest of Drawers and two matching nightstands
This set was by far the hardest to fix up.  It was actually the first set I worked on, and it definitely took the longest.  Most of the effort was spent in gluing and repairing the outside of the furniture.  The panels were coming apart, so I ended getting wood glue and a pipe clamp and slowly putting it all back together.  I decided to leave the chest of drawers natural on top as well as the band around the center of the drawers. It was a pretty maple color with minimal damage.  I painted this my favorite gray color.  My pieces inside my house are this same color, I feel like it goes with every wood tone/metal color.  

The two nightstands had to be sanded pretty heavily with all of the water damage from glasses on the top of the furniture.  I ended up painting the top, I was never going to exactly match that wood stain, so I painted the tops and put some extra coats of polyurethane to make sure water stains don't happen again.

I also had trouble finding new pulls for this set.  They were 2" as well. So, I ended up spraying them matte black, like the chest of drawers above. 

All of this furniture was in our garage at the same time.  It was a lot of maneuvering around all the mess, and bumping in to wet paint.  I even ruined some sweaters bumping into things. So, I have to give a special thank you to my husband for putting up with my furniture habit.  We had to steer clear of going to any garage sales so I couldn't add to my collection.

Now that all pieces have been sold, I am excited to find my next project! Maybe another dining room table? Any ideas?

Tuesday, August 21, 2018

Art Deco Buffet and Dining set

This dining room set made my heart so happy!  I had to start with the "completed" photos, because I love the end result!  I have done pieces of furniture around my house: a desk, tv console, end table.  But have never done such big pieces and even though all these pieces came from different places, it feels like a whole dining room collection.

Let's start with this BEAUTIFUL art deco buffet.  When I see a piece of furniture that I want to redo, I have to fall in love with it.  I usually see it on the internet or at a sale, and it is usually love at first sight and I HAVE to have the piece of furniture.  So, one evening on my usual run, I found this buffet sitting on the curb (I KNOW)!!  I ran the rest of my route as fast as possible, got home, and pulled my husband to the car to pick it up immediately.  I didn't know what I was going to do with it exactly, but loved the inlaid wood, the handles, the details of the door, and the waterfall top.  I am usually a contemporary modern girl, but I love this art deco piece!  I ended up painting it this great gray color.  I have used it previously, and it works so well with wood tones.  It has a very small touch of brown, and I feel it goes well with wood tones, gold accents and oil-aged bronze accents as well.  It was an impulse to paint the cut-out areas, which ended up being a little more difficult, but I think visually it really paid off.

The whole dining set together.  Decided to keep the wood tones from the chairs. The owner of the set picked out the fabric for the chairs, and it picks up the gray perfectly. 


View from above.  The table received a sanding, two coats of primer (Zinnser), 2 coats of HGTV Showcase Primer and Paint and 2 coats of Minwax Polycrilic Protective Finish.  A lot of coats, a lot of sanding.  But well worth it!


 All the chairs received a good scrub, and orange oil.  They were all re-upholstered, with an extra layer of batting.  These chairs were definitely from the 50's, and had multiple layers of fabric on them, with what felt like a million staples.  I love the pattern the owner chose, especially that I really didn't have to line anything up, it made it much easier to re-upholster. 


Here are the chairs with the table.  The mahogany chairs go well with the natural wood of the buffet table.  I delivered the table after the buffet was already in the house, so I was worried/curious if I made the right decision in keeping them natural.  Greg suggested I paint them black, I am so glad I didn't!
 The picture below was a frustrating part of the table refinishing process. I used the wrong polyurethane, and it left a horrible yellow tint to the top.  I had to sand it all off, with a layer of gray. The silver lining was Greg felt so bad for me, he purchased an awesome orbital sander for me!  I had been borrowing sanding tools from family and friends, now I finally own one!

Original seat fabric
New seat cover

 Below is the pedestal table that was purchased by the owner.  She said it reminded her of her grandparent's dining table.  I covered up the details of the wood work on the skirt of the table to update a little bit.  Then, sanded everything down.  The table was actually in great condition.

The table after a few coats of primer.  The heat was a big factor in painting. You shouldn't paint in 90 degree heat, and you REALLY shouldn't paint in 105 degree heat.  The primer was drying so fast, I had to work very quickly and not mess up at all.  I made sure to at least wait 24 hours between each coat of paint and varnish, which was really hard for me, because I usually rush painting.  But I knew I really wanted it to set and cure correctly.


 Here are some extra pics of the art deco buffet before it left my garage.  It really was a beautiful piece, if we had any form of formal dining room I would have kept it. 

Side Note:  We never asked for/received fancy china or silverware for our wedding.  So, what would I have put in it?? I couldn't let it go to waste on me.

 All the doors and drawers were in great shape!


Side View

Gorgeous original pulls
I bought wool pads to try and scrub off the old age, which didn't happen. But I sort of like how old they look!


Well, that was my first table, chairs and buffet!  I hope that it gets used for many years to come! I also think I've found a new hobby!

Monday, May 21, 2018

Sweet memories and new artwork!

Summer is upon us, and the kids are so excited! They love anything to do with water, but I think the beach is their favorite. We have visited Crystal Beach the past few summers with my mom, siblings, nieces and nephews. It brings back sweet memories of our beach trips to Myrtle Beach, South Carolina. My great-aunt lived a few blocks from the beach, and going there was our favorite. From the huge flea market, stopping at every state sign for an obligatory picture, playing putt putt at the most AMAZING courses, to singing a silly song. It went:
We're going to the 
Beach, beach, beach
What a peach
Of a beach.
Silly, but it was catchy and we would sing it all the way there. Now, I've done the same thing with my kids, thank heavens the drive to Galveston is way closer than Myrtle Beach! 

So, all of this led to a great art project. I love having an art idea and bringing it to life. I created my artwork first on the computer, and then re-created on stained wood with acrylic paint.

Above is the picture that I made on the computer. Below is a comparison of paper vs. wood.

I thought it turned out pretty decent! I do struggle with free handing fonts. I will be giving this to my mom as a thank you for all the wonderful memories at the beach growing up, as well as all the future memories we will be making with family. What a peach of a beach!

Wednesday, December 27, 2017

A Handmade Christmas

If you know me, my love language for others is gifts.  I love to make/bake things for others.  I remember as a 14 year old wanting to learn to sew so I could start making things for others.

I always try to make something special around Christmas time, and this year was no different.  It actually had quite a few handcrafted things.  There's something special about receiving something that someone spent time and energy creating.  It took forethought, and a lot of time, and that is something that a lot of people don't do nowadays (yes, I just sounded like I was a 60 year old grumpus).

The first thing I started working on was a crocheted blanket for a sweet friend.  My first idea was to crochet her a pizza slice snuggie, sort of like those mermaid tales, but a huge pizza wedge.  Super fun, but after looking at yarn prices for this larger project, it was going to cost around $80 just for the yarn!  Seemed a little steep for me, so I went with a watermelon blanket instead.  The yarn was cheaper, but way less bulky, so it seemed to take FOREVER to crochet up.  I carried around a yarn bag and crocheted every time the kids played on the playground, it was fun for me to finally see it start taking form.  I made it quite wide, and probably should have made it longer but I ran out of gumption (and yarn).  Turned out great as a snuggie blanket on the couch!


My next project for Christmas was a desk re-do for Mallory.  She BEGGED for a desk for her room.  Her room didn't have that much space, so we needed something on the small side.  As luck may have it, we went to a garage sale a few weeks ago, and she had $10 burning a hole in her pocket.  She said that she was going to find a desk for $10 at the garage sale.  I told her, not likely, but she was adamant in finding one.  We pull up to the garage sale, and guess what?  There was a child sized desk right in front of us for $10.  It needed some love, so we agreed that if she bought the desk, I would fix it up for her for Christmas.  I chalk painted it white, changed the hardware and was planning to modpodge fabric on to the top.  Well, the fabric on top turned out to be a horrible idea, so that extra fabric will (eventually) be turned in to a pillow.  The top was painted white to match the rest of the desk.  Mallory loves it, she is such a crafty person and she loves to make things for others as well.  She has already put it to good use and has spent much time sitting at her desk and has made a goal to make bracelets for her whole class at school.


 I had an on-going project in the garage for Greg's mom.  She requested that an old 12-pained door be turned in to a shelf and decorative hangers attached.  Shelf was added, brackets screwed in and was painted a pretty oatmeal-gray color.  Knobs to hang things were added, and it was done!  It actually took me a while to finish this one, as I was queen of procrastination with this project.  Also, no pictures. :(

My last project started a week before Christmas.  I think I am one of those people that works somewhat well under pressure.  So, with most of the other projects done/under control I decided to start a t-shirt quilt for Greg.  I had been meaning to do this for some time with all of the t-shirts collected from our baseball  teams from Germany.  I also used all the VBS shirts we have received the past few years.  This is how we spend our summers: Germany and VBS! I did Greg's quilt differently than any other I had done before.  I did it in large sections to create more of a "quilted" look, and it actually worked up very quickly.  Since I wanted it to be a surprise, I could only work on it while Greg was at work. This might be the only time where it was helpful that he works so much!  I wondered if he knew what his surprise gift was, he was definitely shocked!  It was nice to give him something that he wasn't expecting.  I feel like we are at that age/stage of life where you just get your spouse what they ask for or need.  It gets harder and harder to surprise them with something unexpected, so it was a nice gift to give!


My garage is almost empty of all the projects, I still have one more out there to be completed over Christmas break.  For our 12 year anniversary we upgraded to a king size bed.  We didn't want to rush a headboard purchase, and Greg was sure that I could make one!  Well, I tried to tell him no I don't have time, but when I got the headboard wood for free I gave in.  I still need to buy the fabric to cover it and to repaint the wall in our bedroom, but now that project seems doable since I am on winter break.

Before you think I have it all under control and am queen of projects, let me share my Christmas shortcomings.  We baked cookies for Mallory to sell to raise money for Salvation Army, and by the time Christmas actually came around, I was so burned out that I baked NOTHING for my own family.  I think Santa just got brownies out of the box and some carrots.  I felt bad, because the kids begged for gingerbread men to decorate and I just didn't have the desire to bake anything.  Also, as I was perusing Facebook a day before Christmas Eve everyone was posting about all the yummy meals they were preparing for Christmas Eve, breakfast for Christmas and Christmas dinner.  You know what we had for Christmas dinner?  Leftovers!  Oops!  

It's all about balance, right??  Now that the crafts have slowed down, maybe I can start feeding my family something other than pizza and hot dogs! 😅

Saturday, April 8, 2017

Mid-Century Console Redo

You know that feeling they tell you when you see the perfect house?  A feeling of longing and contentment and potential all wrapped in to one is the best way to describe it.  Well, I don't have that feeling with houses, but more with furniture.  I saw this piece on a For Sale website on Facebook, and I HAD to have it.  I wasn't even looking for anything, it just popped up on my newsfeed almost screaming at me, "Buy me!!"


 Above is the beginning faze.  I loved the look of the piece. It is a large piece, measuring 19"x70".  It had a great amount of storage, which is something we needed.  I decided it would be perfect as a new TV console.  The price was $30, I offered $25 and she accepted! Greg and I picked it up in the rain, dropped it twice because that thing is HEAVY! Nothing was broken, which means it was made well and withstand time.


I hated the top, it was just a piece of particle board and was swollen over a large section.  I decided to take the piece all apart.  I was really worried about this step because my dad would have put 15 screws, 20 staples, and liquid nails on that top.  But thank heavens, it was attached with about 10 screws that easily came out after I found the right square bit.  Drawers came out, door came off and shelves came out.  Now to prep the surface for paint!  I lightly sanded down everything.


I ran in to a few problems sanding.  At some point, they put a thick layer of stain over the already stain and varnish.  It ended gunking up my sander, so I had to scrape off that extra layer with a chisel. It was tedious, especially since the last piece I did was the worst of them all.


Now to start the fun part!  The drawer and door pulls were absolutely huge!  They were matte black, but after closer inspection I noticed they had been painted as well.  I was going to buy something to match the gold capped mid-century legs, but after taking a sander to the handles, it was gold underneath!  I sanded some parts quite hard so it has a "brushed" look which is fine with me. This saved me $$!


After a base coat of Zinsser (which is great by the way), I got to finally pick out a paint color.  I wanted a light shade of gray.  Do you know how many shades of gray there are??  Millions!  All had a different undertone that you don't notice until comparing to other gray samples.  I struggled with this.  After I put the paint on, it has a hint of brown undertone, not what I was going for but ended up going great with the new wood top. 
Paint cost: $20


 The new top!  I bought this pre-cut piece at Lowe's.  I actually had to get it cut down, which left me with an extra piece about 20"x26" which will later be used as a sign...TBD.  I borrowed stain and varnish from my mom.  I only put one coat of stain, but two coats of varnish.  I didn't sand in between coats of varnish: One, because I'm lazy. Two, because it gave it a rough texture that I liked.
Stain and Varnish: FREE
Piece of wood: $40


Now to assemble!  Don't mind the garage mess, three kids will keep a garage a total wreck ;)


Finished product!  So much storage than before!  We have a ton of extra space, and put some games down from a high shelf so the kids have easier access to them.


Shortly after, Greg HAD to have a bigger TV to go with the bigger TV console. Boys.   


Love the pop of gold at the bottom of the legs!  One of the legs had ripped off and been badly repaired previously, but ended up being an easy fix and is sturdy as ever!


Gold handles!! 


Top of the TV Console.  

In the end, I spent a total of $80, not bad I think!  I love the look that it adds to our living room.  It also provides ample storage for the kid's play things.  The ONLY peeve I have is that since we run our modem from the stand, and the stand has taller legs; I can see cords all the way in the back.  All I need to do is get some sticky strips and adhere the power strip to the back of the console and problem solved!

If anyone spies a mid-century desk with storage, let me know!

Sunday, October 16, 2016

Kitchen Remodel is DONE!

This post has been a long time coming!  I am so excited to share with you what we decided to do with our kitchen.

Before
 When searching for our 3rd house, the thing on the top of my list was a completed kitchen.  Our previous two houses had the wonderful white laminate counter top/back splash that stained at the drop of kool-aid and seemed to never be able to keep clean.  Well, we finally chose a house that had everything on our dream list EXCEPT the kitchen.  So, first thing on our to-do list was to start saving up for a kitchen remodel.  We started with replacing the knobs, microwave, stove/cooktop and the dishwasher.  Then, life happened and the AC had to be replaced and mission trips had to be paid for.  2.5 years later and we finally got started!

Looking toward the laundry room.  Really dislike the faux painted wall of yellow and brown

Had our box flourescent light closed up and 4 can lights took its place
All that white counter top and back splash.  It really showed our house's age.
Still more white counters
White porcelain sink with a ton of scratchs

During

We chose yellow river granite for our counter tops and a tumbled stone with a light grout for the back splash. I really struggled with these decisions for some reason.  It seemed so easy to spend the money in my head, but in real life spending the money seemed a little more difficult. We went with the aged bronze for our faucet and a big stainless steel sink.


Paint!
This decision was another tough one.  I had so many ideas going through my head, I had a hard time just choosing one.  I didn't want it to be too "farmhouse" or too "country" but not super cookie-cutter either.  I was leaning toward a greenish gray, but when seeing them in person, our family actually went with a blue gray called "Fresh Idea".  I think it really compliments the wood tone and earthy tones of the counters.  It seemed WAY too blue at first, but once we got all of the red  and yellow off the wall it really did grow on me!


 Just for reference, the above picture are the original colors.  A butter cream on the top (which our whole house is painted in) and a crimson on the bottom.  All the butter cream was covered up by the new paint and the crimson was covered up by plank PVC bead board (best product ever!).

After (Finally!)


I love the completed look!  It makes me happy to walk in to my kitchen every day!  The counter tops are a great camouflage for crumbs (almost too good), and everything just seems to go together.

I was a little spoiled by renovation shows.  I thought it would all be done within two days, but the whole process took from finish to end was about two weeks and then I had to finish hanging the bead board.  The only thing I have left to do is paint the bead board a high gloss white, but who knows when that is going to happen and I wanted to share!